Sunday, August 24, 2014

Gift Box tutorial / Caixa de presente passo a passo

One of my favorite stamp sets is Stampin' Up Lovely as a tree. I use it a lot for cards, but this time I decided to turn the panel into a box lid, so here is the result. I used the stamp reflection technique, which I teach on this post, as well as how to make the box. So, get your material ready and have fun! If you have doubts, check out Dawn's video, it teaches the reflection technique.

Adoro esse carimbo, mas normalmente uso para fazer cartões de Natal. Dessa vez colei na tampa de uma caixa de papel, fica uma embalagem linda para qualquer presente. E apliquei a técnica de reflexo de imagem que vale para qualquer carimbo, ensino aqui o passo a passo dessa técnica e de como fazer a caixa. Se tiver dúvidas, assista a esse vídeo que ensina a técnica do reflexo de imagem.


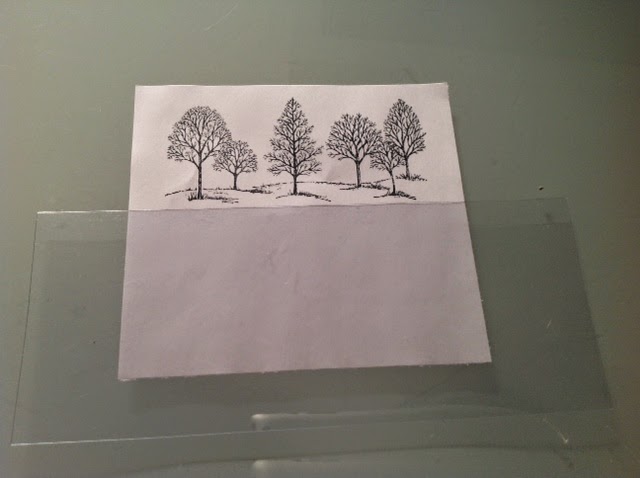
Reflection technique: Stamp the image of your choice on the top part of the paper. The size of the paper base used here was 5 x 4,5 inches.

Técnica de reflexo da imagem: carimbe a imagem que vai utilizar na parte de cima do papel, aqui o tamanho do papel branco usado foi 12,7 cm por 11,4 cm.


2. For the reflection, cut a piece of acetate and stamp the same image on it. Then flip it with the ink facing the paper, press against it and rub so that the ink is transferred to the paper.

2. Para fazer o reflexo, corte um pedaço de acetato (tem várias embalagens de plástico que podem ser utilizadas), carimbem a mesma imagem, virem de modo que a tinta esteja encostada no papel. Pressione a imagem inteira com o dedo para que a tinta seja transferida.


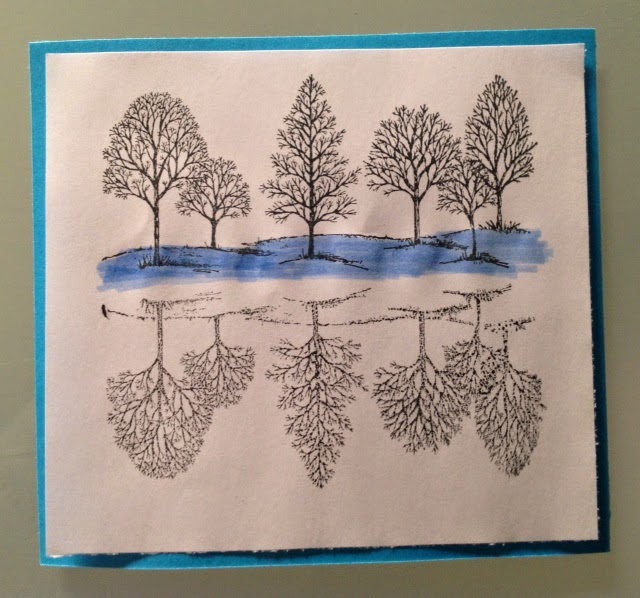
3. Color it using green for the top and blue for the bottom, that's what gives it the idea of a reflection (the trees would be on the grass and the water below). Cut a lightly larger piece of paper in blue to serve as the base for this panel and glue it to the stamped white paper.

3. Pinte em verde na parte de cima e azul embaixo, isso dá a ideia de que em cima é vegetação e embaixo fica a água. Corte um pedaço de papel azul um pouco maior para dar contraste e monte o painel que será colado na tampa da caixa.


NOW THE BOX (BOTTOM):

AGORA A CAIXA (BASE):

1. The box will be slightly larger then the panel, but very little. The sides are 1,5 inches. Here is the template. Score on the dotted lines.

1. A caixa será um pouquinho maior que esse painel. Use o molde abaixo. Dobrar nas linhas pontilhadas.


2. Cut where you see crosses and glue these areas making the box.

2. Corte onde estão os XXX e cole como indicado.


3. IMPORTANT: the only difference between the bottom and the lid is that the lid needs to be a tiny wider on all sides so that it fits on the top. Just add 1/16 to all sides. On the template below you will see red dotted lines, these are the lid lines, notice that all are wider. In this case I cut the sides using paper punches.

3. IMPORTANTE: a única diferença da tampa é que ela precisa ser um pouquinho mais larga, cerca de 0,2 cm senão não vai fechar. É só diminuir no sentido indicado abaixo, o que corresponde às linhas vermelhas. O papel é do mesmo tamanho, apenas os lados são menores, veja o sentido das setas. A minha tampa eu cortei nos lados com cortador de papel.


4. Glue the panel on the top and that's it!

4. Cole o painel na tampa e pronto, caixa finalizada!!


Saturday, August 23, 2014

Victorian Box / Caixa Vitoriana

I love Victorian anything. This wood box was made using patina painting technique and decoupage.

Adoro desenhos vitorianos, ficam lindos em decoupage. Essa caixinha é de MDF (você encontra facilmente online). Pintei em pátina e colei as imagens. Sempre lembre que a cola para decoupage precisa ser passada embaixo e em cima da imagem, depois, use verniz para selar tudo e proteger a pintura.


Thursday, August 21, 2014

Paper Bag / Caixa de papel

I just finished this paper bag after watching a wonderful tutorial by Sam Donald. Her website is the best source I know for paper box videos online. Take your time to enjoy it. Here is today's result.

Acabo de fazer essa caixa que é perfeita para presentes. O tamanho final é 19 x 11 cm. O passo a passo de como fazer está aqui nesse vídeo. A página da Sam Donald é cheia de tutoriais maravilhosos, gaste um tempinho vendo o que ela ensina, são na maioria caixas lindas. O vídeo é em inglês, mas não faz diferença, sinceramente, para quem assiste.  No site tem os tamanhos do papel em cm e onde você marca para dobrar.

Eis o resultado:


Purse Paper Box tutorial / Mini bolsa de papel passo a passo

This purse is made with the Tag Topper Punch, made by Stampin' Up. Very cute and easy to make and you can use it to hold treats like little chocolates to decorate a party table. You can find a great video tutorial here.

Essa bolsinha de papel é feita com um cortador chamado Tag Topper Punch, que você pode comprar aqui. Se não quiser, corte a aba da bolsa no formato que preferir, não é obrigado ter o cortador. Se quiser ver o passo a passo em vídeo, esse aqui é ótimo.


1. First cut a piece of paper 6 x 2 inches. And a small one 1 1/4 x 2 in. Score on the marks below.

1. Você vai precisar de dois pedaços de papel. Um de 15.2 cm por 5 cm. O segundo de 2.7 cm por 5cm. O maior você dobra nas distâncias marcadas abaixo. 


2. Glue the small paper on the right edge, it will fit perfectly. Cut this edge using the Tag Topper Punch.

2. Cole o papel pequeno no final logo depois das duas dobras próximas, no lado direito. Vai caber perfeitamente. As fotos usam o cortador, se não tiver, corte na mão no formato que quiser.


3. Put some glue on the area where the two closest score lines are, but on the inside. 
This is where you will place the ribbon.

3. Ponha cola na area junto do papel colado, onde há duas dobras próximas (do lado oposto do papel), é aí que você vai colar uma fita fina que será a alça da bolsa.


4. Fold all score lines and make a small hole so that you can close the "purse".

4. Dobre a bolsa até ficar no formato abaixo e fure no buraco da aba para colocar um grampinho.


5. Finished!! you can glue small treats inside the box, like little chocolates and candies.

5. Você pode colar pequenos chocolates na base da bolsa e decorar mesas de festinhas de criança.


Sunday, August 17, 2014

Treat Box Tutorial / Caixinha de papel tutorial

This is an easy box to make and you can change the dimensions depending on what you are going to put inside. Here is the tutorial:

Essa caixa no formato de bolsa é fácil de fazer e você muda as dimensões como quiser. Aqui está o passo a passo:


1. Cut a piece of paper with the measurements below. The paper is 5,5 in by 9 inches. Score on the marks and cut the two flaps marked with xxxx.

1. Corte um papel nas dimensões abaixo, mas os números estão em polegadas, converta. Dobre as linhas e corte onde tem xxxx.


2. Fold all sides, it should look like this:

2. Dobre todas as linhas, deve ficar assim:


3. Then cut the boarders with a boarder punch of your choice.

3. Se tiver cortador de bordas, use-o, fica mais delicado.


4. Now before you glue the side, make on both sides, cut a strap on the width you want and stick it to the side of the bag.

4. Antes de colar as laterais, fure o lado para colocar a alça da bolsa.


5. Glue the sides and the flaps and you are done!! I added a butterfly on the strap, but you can embellish it whichever way you want.

5. Cole os lados e pronto! Eu acrescentei uma borboleta, mas enfeite do jeito que quiser.


Wednesday, August 13, 2014

Card Kits / Kits de cartões

Here are some examples of card kits I made.

Seguem exemplos de kits de cartões que fiz.

1. In this first one I used the three step stamping technique and you can learn how to get this beautiful effect in this tutorial, click here.

1. Nesse primeiro eu usei a técnica de carimbo triplo, tem um passo a passo aqui.


2. The second kit I used a punched butterfly to give it some dimension and used the same stamp on the box and envelope.

2. Nesse eu usei flores e borboletas em relevo. Use o mesmo carimbo no envelope.


3. The third I also used a butterfly, but his time I stamped it, cut it and added dimensionals.

3. Nesse também acrescentei além dos carimbos, uma borboleta com fita dupla face com espuma para dar relevo.


Related Posts Plugin for WordPress, Blogger...
Pin It button on image hover