Tuesday, July 21, 2015

Klimt style tray / Bandeja com árvore estilo Klimt

I love the Austrian painter Gustav Klimt and his famous trees are a trademark. I found a stencil with a look-alike Klimt tree and I just had to use it! :)  I painted this tray using the patina technique with blue underneath with the stencil on top. Here is the final result and the original Klimt tree so that you have a hint of his beautiful art.

Um de meus pintores favoritos é o austríaco Gustav Klimt. Achei um stêncil com o desenho de uma árvore muito parecida com as dele, que são imitadas até hoje. Pintei essa bandeja em MDF com pátina usando azul no fundo e o stêncil. Antes da bandeja, veja a árvore original, uma introdução à arte do Klimt, para quem não o conhece.


The Original Klimt tree


Now my tray


Vintage Wooden Box / Caixa MDF Vintage

Vintage is definitely my favorite style, you just can't compete with ladies like this one I used on the top of the wooden box. For this I used the patina painting technique, stencils, ribbon and decoupage.

O estilo vintage é meu favorito, principalmente para caixas. Acho lindas as imagens desse tipo. Nessa caixa em MDF eu usei pátina com efeito envelhecedor, stencil, fita e decoupage.


Angel box / Caixa MDF decorada com papel

I usually paint wooden boxes, but in this case I decided to use paper instead and I love the result. For this I used double sided cardstock both inside and out and some embellishments. I only painted the sides on the inside and the base. Is the angel cute or what?

Eu normalmente pinto caixas de MDF, mas aqui decidi cobrir com papel, dentro e fora. Achei que a união tinta/papel ficou super legal, além do anjo que é fofo.


Monday, July 13, 2015

Ballerina wooden box / Caixa Bailarina em MDF

I have a friend who dances ballet and last week when I saw this paper I just had to make something for her. I decided to paint a wooden box because it's been a while since I did that (my crafting life has been very much paper, paper, paper). For this I used two colors of paint that matched the paper, lace and pearls. The technique for painting the stripes I show you below. Here is the before and after:

Quando vi esse papel semana passada, decidi fazer algum presente para minha amiga que dança balé, me apaixonei pelo desenho. Optei por uma caixa bem vintage, até porque ando com saudade de pintar MDF, ultimamente só mexo com papel. Para essa caixa, usei 2 cores de tintas, fita de renda e pérolas. A técnica que mostra como fazer as listras de cores diferentes eu mostro logo abaixo. Veja o antes e depois:


The flowers are popped up with dimensionals / As flores estão em relevo


Painting the stripes / Pintando as listras

First, paint the whole area, then add tape (the easy to pull type) after it's completely dry. The distance will determine how wide the stripes are. Use the second color inside the uncovered area and after dry, lift the tape.

Primeiro, pinte toda área, depois de seco, cole pedaços de fita crepe onde quiser as listras. A distância entre as fitas vai determinar a largura das listras. Pinte com a segunda cor nos espaços descoberto e por último, após secar, remova as fitas.


Thursday, July 2, 2015

Decoupage on a table / Mesinha com decoupage

I love seeing transformation by crafting techniques and this is precisely what I did on this little side table. It was plain (dull) wood and by adding collage to it I changed it completely. This technique uses napkins (yes! hard to believe) and Mod Podge. I glued about 7 different design napkins and here is the result.

If you want to see how this is done, I found a few videos with step by step instructions, click here.

Uma das coisas que mais amo é transformar produtos com técnicas de artesanato. Veja essa mesinha de apoio que era de MDF e virou outra coisa com colagem de guardanapos (sim! difícil de acreditar). Colei uns 7 tipos de desenhos diferentes e no tampo usei apenas um que achei perfeito. Veja que transformação!!

Se quiser ver como aplicar guardanapo em madeira, clique aqui para assistir ao vídeo da Gláucia Baruch. 


Thursday, June 11, 2015

Little green box / Caixinha verde

So here is another little box, perfect for small gifts. For this I used Stampin' UP Curvy Keepsake Box die, I love it because it's quite simple to put together and you have many possibilities in terms of embellishments. Here I used an idea from Stampinconnection blog. Instead of just using the die, I added a little square box inside, it helps keep the gift steady inside the box.

Fiz essa caixinha usando o cortador Curvy Keepsake Box da Stampin' UP, uma de minhas empresas favoritas para produtos. Gosto muito desse modelo de caixinha e nessa aqui usei a ideia do blog Stampinconnection de fazer uma caixa quadrada e colocar dentro, isso ajuda a manter o presente mais protegido.


Friday, June 5, 2015

Baby boy shadowbox / Caixinha para bebê menino

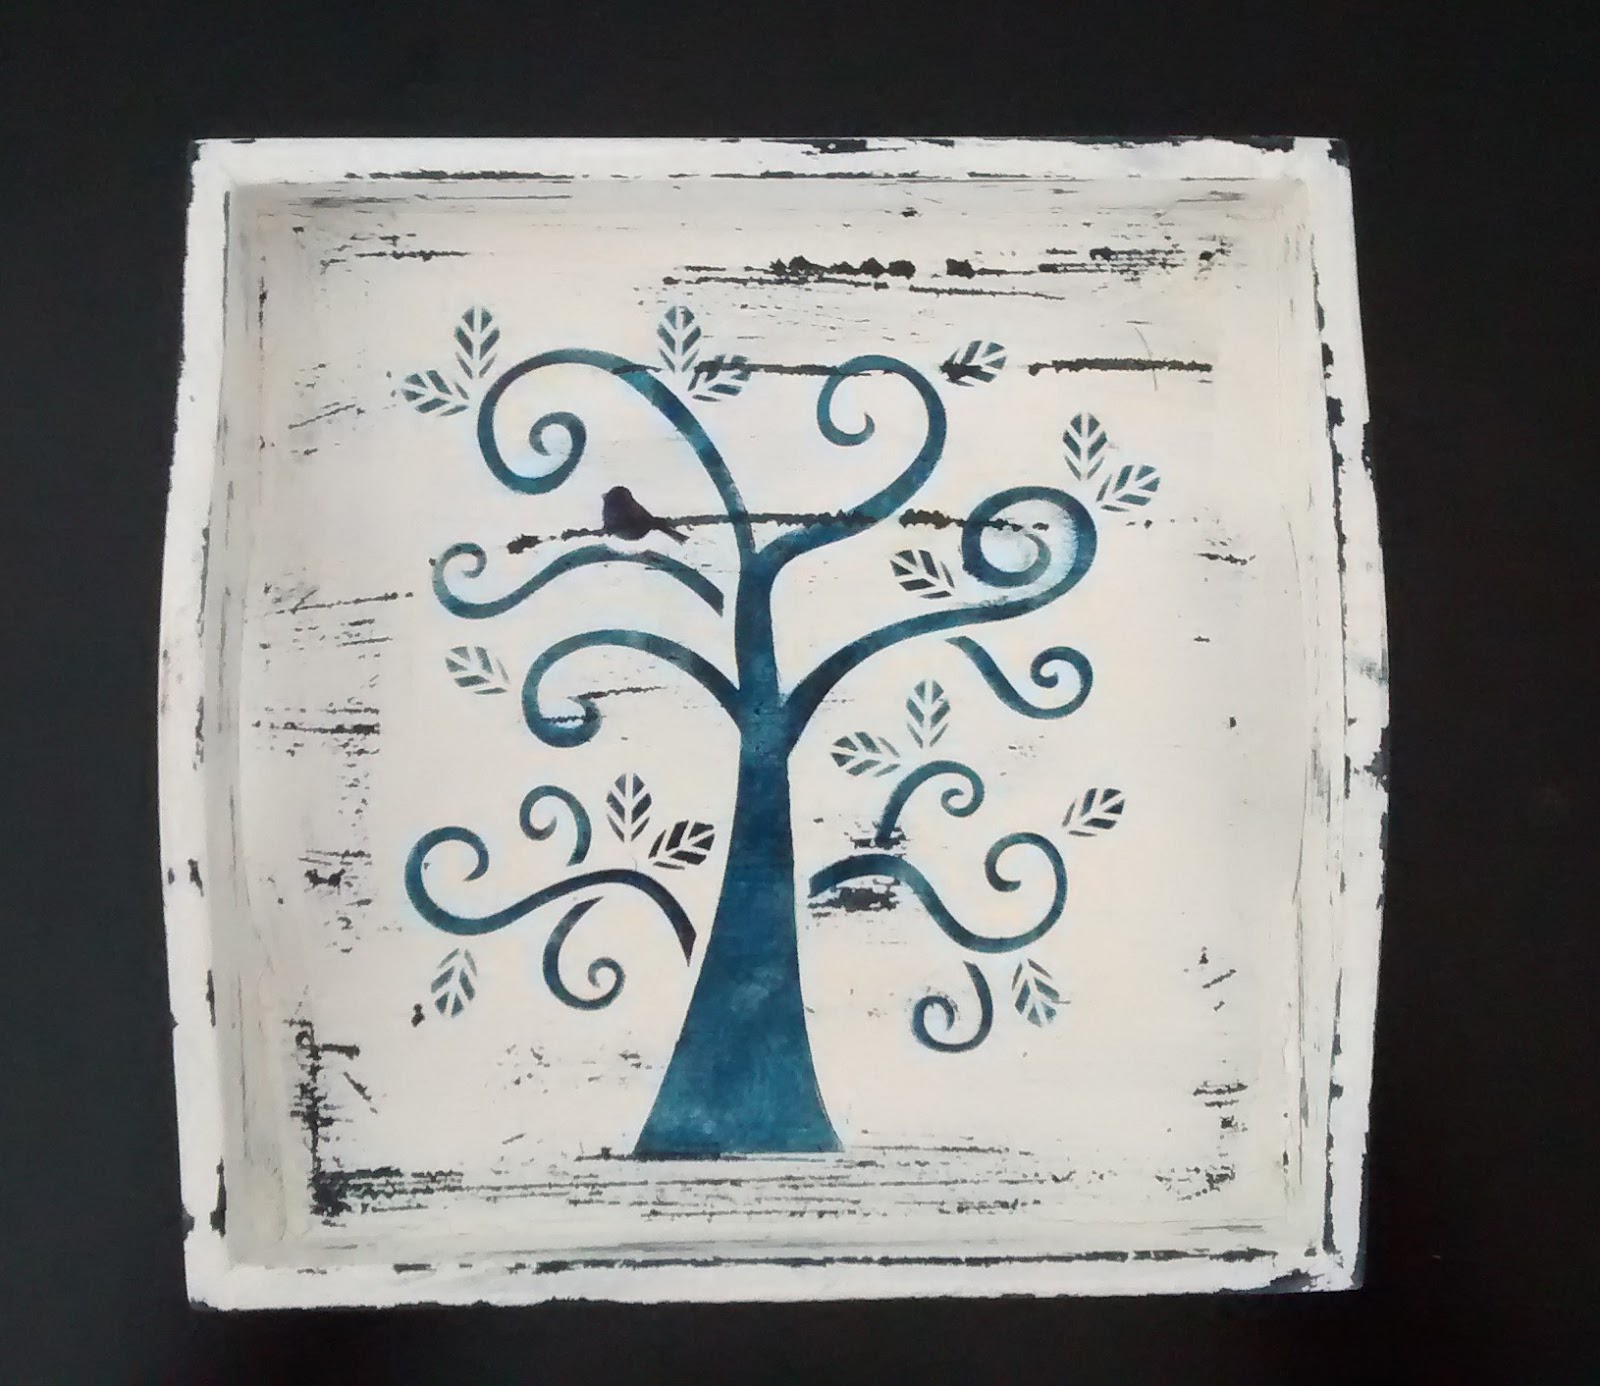
My sister-in-law just had a baby boy called Caio and asked me to make her a box for his room. I'm pretty tired of blue for boys and pink for girls, so I chose light green instead. Inside, a baby crib, crochet miniature clothes a bear and a few other miniatures. I must say I love the results! :)

Check the step by step tutorial below, but before that, the final results:

Minha cunhada acaba de ter um filho (Caio) e me pediu para fazer uma caixinha para o quarto dele. Ando cansada do estereótipo rosa/azul, então optei pelo verde claro. Dentro usei algumas miniaturas: berço de mdf, roupinha de crochê, urso de pelúcia... acho que ficou fofo!  :)

Abaixo, o passo a passo, mas antes, o resultado final:


TUTORIAL

1. The first thing to do is to paint the shadowbox. In this case I chose green with a patina technique that is a bit faster than the regular one. I paint two coats of the main color, then I wet a clean brush with very little paint to cover it, in this case, with white. Note that there is almost no paint, you just brush is very lightly in order to give it a patina look. The brush is almost dry. For another patina technique, click here.

PASSO A PASSO

1. A primeira coisa a fazer é pintar a peça (caixa em MDF). Aqui usei como cor principal o verde e apliquei uma técnica de pátina bem mais fácil que o normal. Você aplica duas camadas da cor principal e depois molha bem pouquinho um pincel limpo, ele fica praticamente seco. Depois dê umas pinceladas bem de leve, controlando o efeito de pátina. Para outra técnica de pátina, clique aqui.


The box sides / Lados das caixas


2. Choose the miniatures and objects you want to use. Bears are always a good choice, but click on the theme "shadow box miniature" option on the right side of the blog and you can see other examples. 

The next thing I did was to paint the miniature crib (white is always a pain, note that it takes at least 4 coats to look nice). Here I had already applied 3 coats and it still looks uneven.

2. Escolha os objetos que quer usar, eu gosto muito de ursinhos, mas logo do lado direito você tem um link de temas, clique em "caixinhas" e veja outras opções. 

Depois você pinta as miniaturas que você escolheu para a caixinha, nesse caso, um berço também de MDF. Detalhe: branco é sempre muito difícil, leva pelo menos umas quatro camadas para ficar ok. Aqui já tinha 3, veja como ainda estava manchado.


3. The back wall is the most important part of the shadowbox because it serves as a background. For this box I chose to use a paper that matched perfectly the teddy bear. I always use paper on the background to add color, it makes a huge difference from being just a solid color all around.

3. A parede de trás da caixinha é sempre a mais importante e eu sempre uso um papel bonito para acrescentar cores. Nessa aqui, consegui um papel de parede perfeito porque tinha ursos de pelúcia da mesma cor que o que usei.


4. Another thing that I like to do is to add the baby's name to the shadowbox. You can either use the miniature letter directly on the background wall or (as I did here), create a "painting" with paper and a frame. I painted the letters white so that it would contrast with the paper.

4. Também fica bem legal pintar letras em miniatura e colar ou direto na parede ou, como fiz aqui, dentro de uma moldura, como se fosse um quadrinho. Pintei as letras de branco para contrastar com o papel.


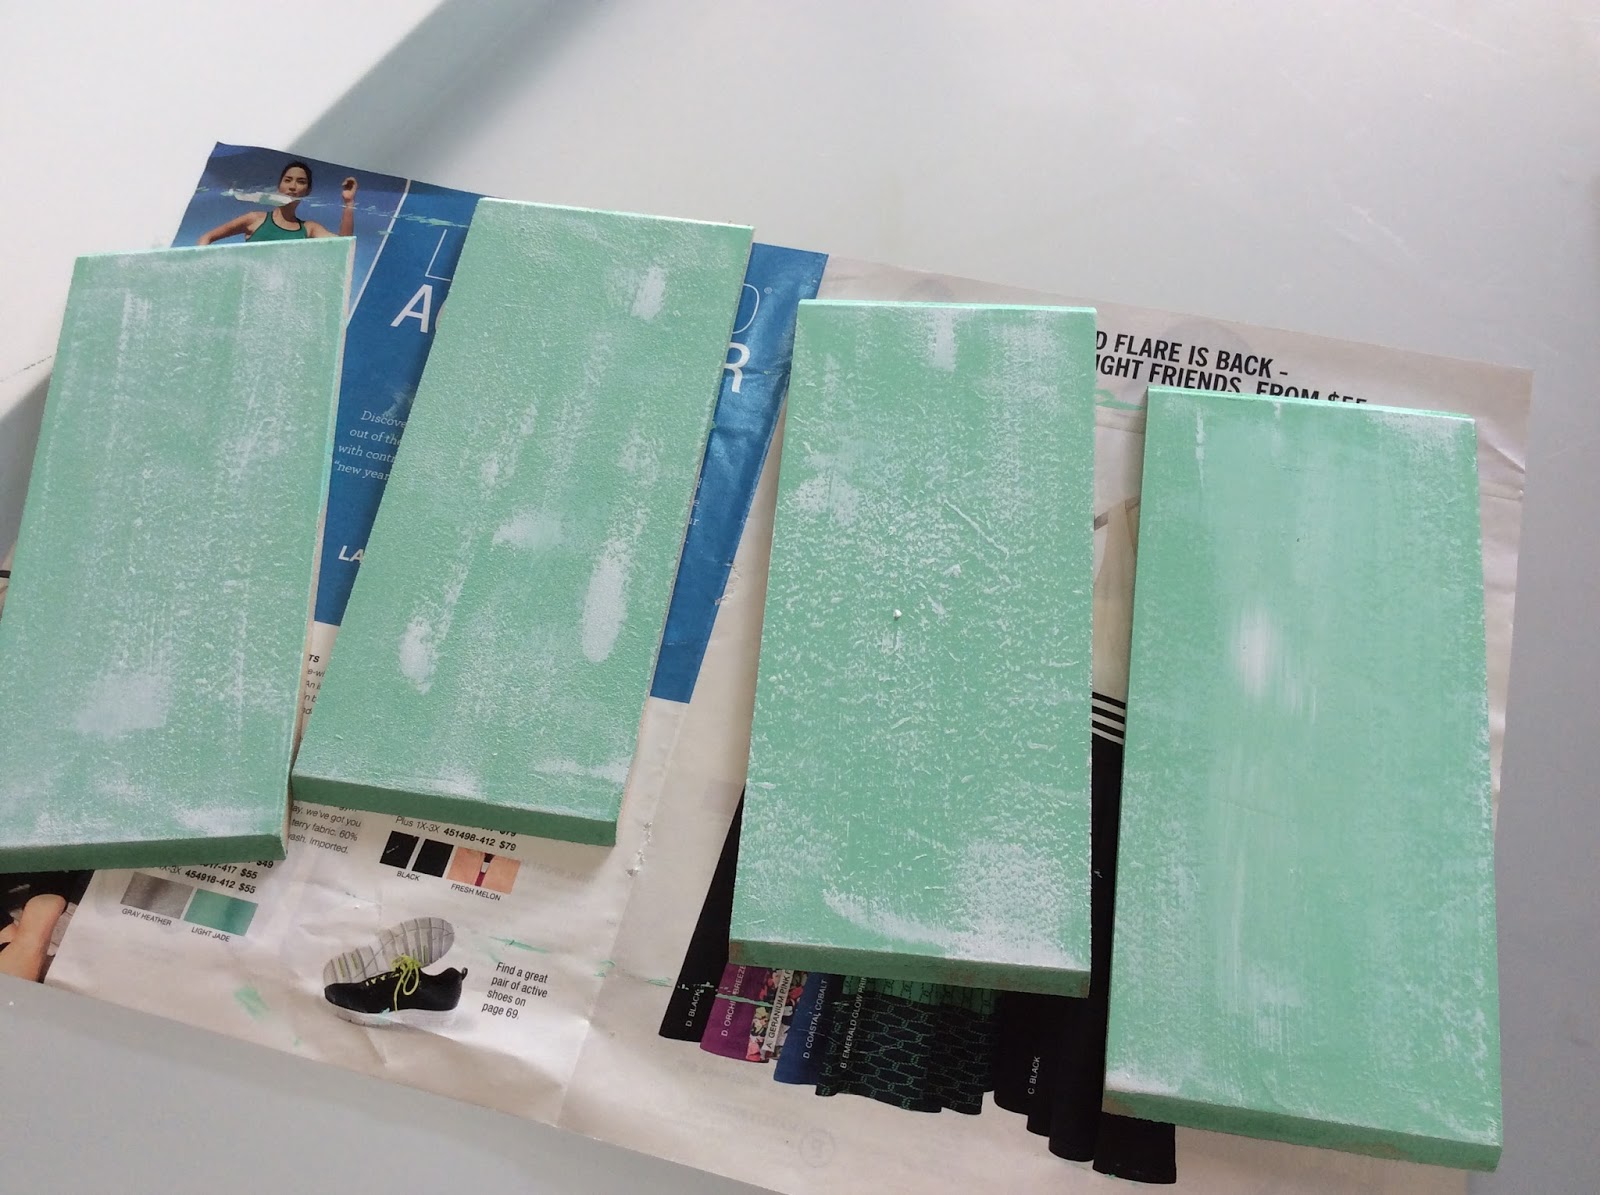
5. The crib mattress

To make the mattress I used three pieces of foam and glued them with dimensionals (foam tape), this gives it height and looks like a real mattress.

5. O colchão

Para fazer o colchão, corte 3 pedaços de folha de espuma para artesanato e cole-as com fita dupla-face espuma, isso permite que o colchão fico fofo e alto.


6. For the light I glued a plastic bead on a button and glued it to the ceiling.

6. Para o lustre, colei uma bola de plástico (coisas de bijouteria) em um botão e colei no teto da caixinha.


7. Last but not least, assemble the box. This is the most fun part.

7. Por último, monte a caixinha, essa é a parte mais gostosa.


Related Posts Plugin for WordPress, Blogger...
Pin It button on image hover